MOVE 2
(return to Quick Start Two)
Receiving your Turn Notification
When you receive email notification that your universe has Turned, start your Imperial Wars game client and enter your Screen Name and Password, as you gave it in your Account page. If you checked the boxes by the Login screen text boxes, the game has remembered them for you. After logging in, note the due date for your move in the Account Information box in the lower left of the Opening Screen. As before, click on GO TO MY EMPIRE to go to your Homeworld, where, if you stayed in synch with Move 1, the two Fleets you did not Fly remain.
Your Homeworld screen beginning Move 2
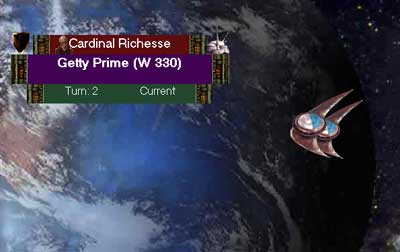
As in the Quick Start - Move 1 section your Game Client always opens your game at your Homeworld. If you completed Move 1 as our example suggested, (moving three fleets with 5 scouts and 1 cruiser on each to the three Un-explored worlds) the most apparent change you will see here are that there are two fleets left behind here at your homeworld.
The Move 2 Homeworld Planet screen
 Lets
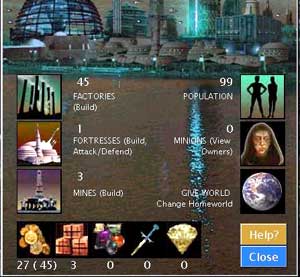
take a look at the Planet screen and see what has happened here on our
Homeworld. The population has grown a bit. Below the Imperial Wars graphic,
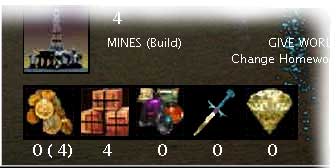
there are 27 Imperial Credits available for purchasing ships now. These
are the Imperial Credits left after the last turns ship purchases plus
3 new Credits created on this turn by the factories and population, using
the 3 Raw Materials that the Mines stockpiled last turn. The 45 in parenthesis
represent the maximum number of Credits we could spend on Buying ships,
based on the number of factories here, which is, of course 45.
Lets
take a look at the Planet screen and see what has happened here on our
Homeworld. The population has grown a bit. Below the Imperial Wars graphic,
there are 27 Imperial Credits available for purchasing ships now. These
are the Imperial Credits left after the last turns ship purchases plus
3 new Credits created on this turn by the factories and population, using
the 3 Raw Materials that the Mines stockpiled last turn. The 45 in parenthesis
represent the maximum number of Credits we could spend on Buying ships,
based on the number of factories here, which is, of course 45.
Our 3 mines have produced and stockpiled 3 more Raw Materials ready for transforming them into Imperial Credits next turn.
Lets close this screen and
see what we have discovered at one of the worlds that we sent our fleets
to out beyond our own homeworld.
 You may have already explored and discovered the last of the three main
screens in Imperial Wars besides the World screen and the War Room, the
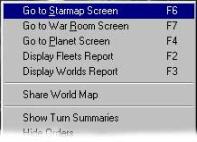
Starmap screen. You reach it by Right clicking to reach
the shortcut menu and choosing, Go To Starmap Screen. This is a
map representing our current view of the universe. The rotating cursor
(not shown) over a World icon with a highlight represents your homeworld.
We can also now see and identify 3 worlds besides our homeworld. And now
there are several new un-explored worlds connected to these new worlds.
You may have already explored and discovered the last of the three main
screens in Imperial Wars besides the World screen and the War Room, the
Starmap screen. You reach it by Right clicking to reach
the shortcut menu and choosing, Go To Starmap Screen. This is a
map representing our current view of the universe. The rotating cursor
(not shown) over a World icon with a highlight represents your homeworld.
We can also now see and identify 3 worlds besides our homeworld. And now
there are several new un-explored worlds connected to these new worlds.
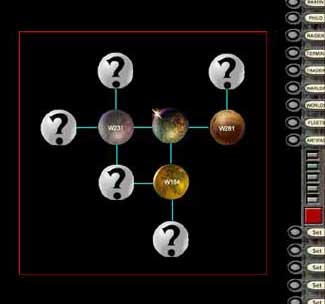 On
the right side of the screen is the Filter Bar. The Filter Bar
has 10 pre-set filters above the Legend Lights and 5 User Defined filters
below. We wont go into a lot of detail about filters in this Quick Start
but you can find a lot of interesting ways to determine what attributes,
fleets and artifacts are at your worlds by use of the Starmap filters.
They are covered in detail in the Players Manual.
On
the right side of the screen is the Filter Bar. The Filter Bar
has 10 pre-set filters above the Legend Lights and 5 User Defined filters
below. We wont go into a lot of detail about filters in this Quick Start
but you can find a lot of interesting ways to determine what attributes,
fleets and artifacts are at your worlds by use of the Starmap filters.
They are covered in detail in the Players Manual.
Double-click on each of the 3 new worlds you have discovered connected to your homeworld to view their World screens. The first thing you may notice is that you own these worlds. They were un-defended so your fleets automatically captured them in your name.
Ownership (Contention)
 The way that Imperial Wars universe determines who owns world or fleet
objects is usually based on whether a world or fleet is Defended,
meaning whether or not there are ships on a fleet or fortresses on a world.
If they are Un-defended, any player who is in their location will
automatically capture them. If there is more than one player in the presence
of an Un-defended world or fleet, than the world or fleet will stay, or
go un-owned until it is clear who should get ownership. Contention is
always settled after all the other game actions have been resolved. This
is the rule of Contention. It is the heart of how your universe
works.
The way that Imperial Wars universe determines who owns world or fleet
objects is usually based on whether a world or fleet is Defended,
meaning whether or not there are ships on a fleet or fortresses on a world.
If they are Un-defended, any player who is in their location will
automatically capture them. If there is more than one player in the presence
of an Un-defended world or fleet, than the world or fleet will stay, or
go un-owned until it is clear who should get ownership. Contention is
always settled after all the other game actions have been resolved. This
is the rule of Contention. It is the heart of how your universe
works.
There are some variations on this rule, one covered below about Rebels and it may seem a little complex. For further information about Contention, there is a special note on Contention online at http://iwars.org/downloads and it is covered in detail in the Players Manual.
Move 2 Commands
As you look at your new worlds, it is impossible for us to guess exactly what you find. So, well mention a few of the more obvious actions that you might want to take now that your Empire has grown to 4 worlds and there are several new worlds waiting for you to explore them.
Were going to show you how to do the following five actions and the commands you will use to do them.
- Convert a Scout ship into a Fortress to protect a world
- Transfer ships from one fleet to another
- Transfer Raw Materials from a world to a Fleet
- Attack a Fleet (or World) owned by someone else.
- Fly Fleets across multiple worlds
From these common commands you will be able to figure out how to do several other commands when you need them. This is a long game and you will not necessarily use all the commands at the beginning. As the game grows in complexity you will find that there are commands for specific situations as the play matures.
Convert a Scout ship into a Fortress to protect a world
We chose Scouts as part of the Fleet complements that we sent to explore from our homeworld. They have no offensive firepower but they can travel up to 4 worlds at a time and they are very useful. They can be converted into many useful objects. Unless there is industry at this new world we cannot have the world buy itself a fortress, as we could at our homeworld. Here, the only way we can protect this world is to Convert one of our Scouts to a fortress.
| If you are not currently at one of the World screens for a newly discovered world, go there now. Once there, open up the Fleet screen of the Fleet that you sent to this world. Click on the CONVERT SCOUTS button to display the Covert Scouts screen illustrated below. |
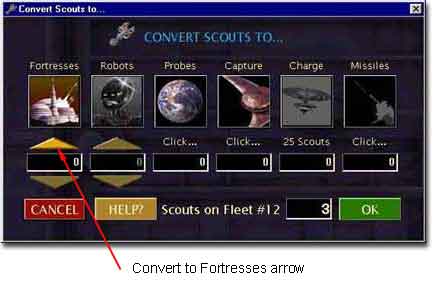 As
you can see, there are a number of things we could potentially do with
our Scouts but we want to simply convert one of them to a Fortress for
the world below. This Fortress will automatically Defend our world from
accidental captures or from purposeful invasion. Click on the lit gold
arrow that points to the Fortress icon. One click will convert one Scout.
Clicking OK will put this command in your Orders Text area.
As
you can see, there are a number of things we could potentially do with
our Scouts but we want to simply convert one of them to a Fortress for
the world below. This Fortress will automatically Defend our world from
accidental captures or from purposeful invasion. Click on the lit gold
arrow that points to the Fortress icon. One click will convert one Scout.
Clicking OK will put this command in your Orders Text area.
Transfer ships from one fleet to another
It is probable that you will find at least one Fleet engine that was previously un-owned at one of your new worlds. As mentioned above in Ownership, your fleet automatically captured it for you since it was Owned and Defended and the new one wasnt. Transferring ships to a captured fleet not only allows that fleet to move but it also protects your ownership of the Fleet and since there are only 300 Fleets in a universe they are the very valuable objects in Imperial Wars.
 Open up the Fleet screen of the Fleet that you originally sent to your
new world and where at least one new fleet has been captured. This time,
Left click on the Scout ship icon on the Fleet
screen to display the Transfer Ships screen. Left clicking on any
of the ship icons in the Fleet screen will bring up this transaction screen.
Open up the Fleet screen of the Fleet that you originally sent to your
new world and where at least one new fleet has been captured. This time,
Left click on the Scout ship icon on the Fleet
screen to display the Transfer Ships screen. Left clicking on any
of the ship icons in the Fleet screen will bring up this transaction screen.
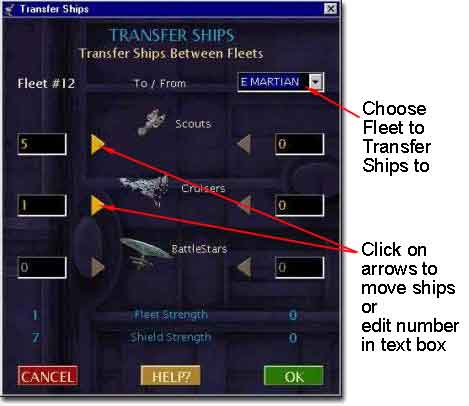
Look at the Transfer Ships transaction screen illustration. The left side of the screen represents, the fleet we are accessing this screen from. In the drop down box on the top right, select the fleet you wish to transfer ships to. The arrows light up in the boxes representing the ships that are available for transfer.
Left click on the arrow next to Scouts or any other available ship type that you wish to Transfer, in either direction. Each click will transfer one ship to the other fleet. Click on OK to complete the transfer. The transfer command is now reflected in the Order text area.
Transfer Raw Materials from a world to a Fleet
 As mentioned earlier, there are very few Raw Materials being stockpiled
at your homeworld each turn since you have so few Mines there. It may
be that you want to transfer Raw Materials stockpiled at one of your outlying
worlds onto a Fleet that will return to your homeworld (or another world)
to offload it so that your world economy can turn it into an Imperial
Credit. There may very likely not be any Raw Materials available on your
second move but there will be on later moves so you can refer back to
this action if there are no Raw Materials available yet. Look to see if
there are any Raw Materials stockpiled on one of your new worlds. There
will be a number underneath the Crates icon on the Planet screen if so.
As mentioned earlier, there are very few Raw Materials being stockpiled
at your homeworld each turn since you have so few Mines there. It may
be that you want to transfer Raw Materials stockpiled at one of your outlying
worlds onto a Fleet that will return to your homeworld (or another world)
to offload it so that your world economy can turn it into an Imperial
Credit. There may very likely not be any Raw Materials available on your
second move but there will be on later moves so you can refer back to
this action if there are no Raw Materials available yet. Look to see if
there are any Raw Materials stockpiled on one of your new worlds. There
will be a number underneath the Crates icon on the Planet screen if so.
While you can transfer items from either the fleet or the world, for this illustration let's open up the worlds Planet screen by Right clicking on the Worlds name on a world where there is a Raw Material available.
Left clicking on the Raw Material icon will call the Worlds Transfer Items & Artifacts transaction screen as illustrated below.
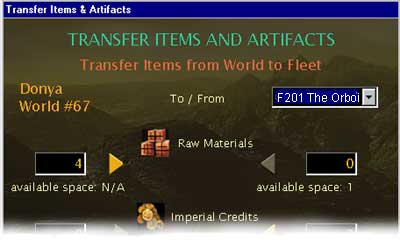 As
in transferring ships, the World is represented on one side of the transaction
screen and the fleet on the other. Clicking on the lit arrows moves Raw
Materials from a Fleet or World to the other. You can also enter a number
directly into one of the text boxes.
As
in transferring ships, the World is represented on one side of the transaction
screen and the fleet on the other. Clicking on the lit arrows moves Raw
Materials from a Fleet or World to the other. You can also enter a number
directly into one of the text boxes.
It should also be fairly obvious that on this screen you can also transfer Imperial Credits and artifacts, as you find them in the game, between worlds and fleets.
Attack a Fleet (or World) owned by someone else.
It would be impossible to have met another player so early in the game. However, there is another entity that can own objects in your universe besides other Starlords, the Rebels. While Rebels will not attack you, you will have to attack them if you intend to capture worlds or fleets that they have defended. You may run across a Rebel world or fleet this early in the game and it is good practice to know how to attack another fleet or world, if necessary.
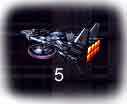
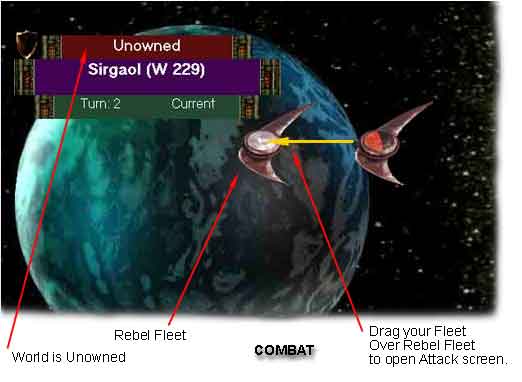 In
this example, you have run across a Rebel Fleet, which has one Scout on
it.
In
this example, you have run across a Rebel Fleet, which has one Scout on
it.
Because there are two contending forces at this world and the world is un-defended, it is forced Un-owned. Rebel Fleets have a silver cap on their fleet engines.
Attack the Rebel Fleet by dragging your Fleet symbol over the Rebel Fleet symbol and dropping it. This displays the Fleet Attack/Defend Transaction screen. To Attack a world drag and drop your Fleet symbol over the Worlds name. Note that there are other ways to access the Attack/Defend screens from Fleet and Planet screens. Using the Drag method, places the target Fleet or World directly into the first Target box, with the Attack button already chosen.
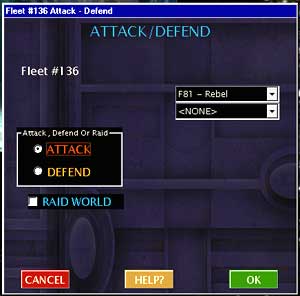
Note: Raiders should notice that this is also where the Raid world option is also. Raid is a Fleet-only command for Raiders.
Note: If you open the World Attack screen you will find the Ravage world command, available to any player but of most value to the Raider.
Fly Fleets across multiple worlds
After you have transferred ships between Fleets, transferred any items necessary from or to a World and converted Scouts where necessary, you will want to be certain that your Fleets continue to Fly on to un-explored worlds where there are plenty of things to discover including your fellow Starlords. Moving Fleets from your new worlds is exactly the same as described in QS Move 1. Drag your Fleets to the Stargate and click on a world next to the world where the cursor is revolving until you have chosen a path to a world with a Question Mark in the Flight Plan window. You will do the same with fleets that you want to fly back to your Homeworld.
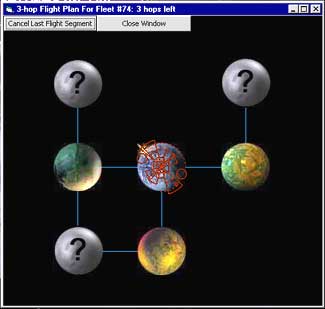 Flying
Fleets from your homeworld in the Move 1 is very similar except that now
the Flight Plan screen will let your fleets move through more than one
world at a time, depending upon what kinds of ships make up your fleet.
You can begin to see why it is important to build fleets that are flexible
and fast as well as powerful. Only worlds that your fleet can legally
fly to will show up in this window.
Flying
Fleets from your homeworld in the Move 1 is very similar except that now
the Flight Plan screen will let your fleets move through more than one
world at a time, depending upon what kinds of ships make up your fleet.
You can begin to see why it is important to build fleets that are flexible
and fast as well as powerful. Only worlds that your fleet can legally
fly to will show up in this window.
Buy ships for those fleets that were at your homeworld and move them from world to world in the Flight Plan screen to make certain that every un-explored world will be visited on this upcoming turn.
In this Move 2, continue to examine each fleet and each world. Make certain to take advantage of any situation offered that will let you Explore and own the objects you are finding. No matter what Character type you are playing, they will be useful for trade later on. We have accomplished the objectives set out for move 2 and it is time Save or Submit the Move.
Save Your Move
To make certain that none of our orders are lost we can Save your move in the War Room. Right click to bring up the shortcut menu and click on GO TO WAR ROOM SCREEN. Click on the Save/Submit Move button and choose Save or if your move is compete, click on Submit Move and OK.
From here, you can return to the Quick Start Two page or to the Quick Start - Move 1 page.